Sunday, November 30, 2008

Golden Vanilla Bean Caramels


Notice that the title of this blog is not "Kat Makes Candy" or "Kandy Kat" or "Kat Kooks Kandy." There is a reason for that, other than the fact that those names are abhorrent. The reason is that making candy is hard. Even harder than baking. True, baking is an unforgiving science, but if you adhere to a good and proven recipe, you'll usually be okay. You may not have the prettiest cookie/cake/pie, but you'll be okay. Not so with candy making. If, for example, you do not temper your chocolate to the precise degree, you'll instantly drop dead. Don't ask me how I know this.

When I found out that November's Daring Baker's Challenge included an optional caramel candy recipe, I initially assumed I'd pass.We have enough junk laying around the apartment already, without adding my corpse to the detritus. But I am Chief Peanut Brittle and Fudge Officer at my parents' house during the holidays, so I thought it might be time to add to my skill set.

Even more so than with baking, the key to successful candy-making is precisely measuring out your ingredients and having them ready at hand when the time comes. I fumbled a bit with my vanilla at the end, and as a result my caramels were a bit tougher than I would've liked. You'll be relieved to know that I did not die, although I did suffer some first-degree burns to my fingers from "checking" the caramel too hastily. A small price to pay for broadening the ol' candy repertoire.

Golden Vanilla Bean Caramels
- Recipe from Pure Dessert by Alice Medrich -

Makes approx. eighty-one 1-inch caramels
  • 1 cup golden syrup
  • 2 cups sugar
  • 3/8 teaspoon fine sea salt
  • 2 cups heavy cream
  • 1 1/2 teaspoons pure ground vanilla beans, purchased or ground in a coffee or spice grinders, or 1 tablespoon plus 1 teaspoon pure vanilla extract
  • 3 tablespoons unsalted butter, cut into chunks, softened
EQUIPMENT: 9-inch square baking pan, candy thermometer

1. Line the bottom and sides of the baking pan with aluminum foil and grease the foil. Combine the golden syrup, sugar, and salt in a heavy 3-quart saucepan and cook over medium heat, stirring with a silicone spatula or wooden spoon, until the mixture begins to simmer around the edges. Wash the sugar and syrup from the sides of the pan with a pastry brush dipped in water. Cover and cook for about 3 minutes. (Meanwhile, rinse the spatula or spoon before using it again later.) Uncover the pan and wash down the sides once more. Attach the candy thermometer to the pan, without letting it touch the bottom of the pan, and cook, uncovered (without stirring) until the mixture reaches 305°F. Meanwhile, combine the cream and ground vanilla beans (not the extract) in a small saucepan and heat until tiny bubbles form around the edges of the pan. Turn off the heat and cover the pan to keep the cream hot.


2. When the sugar mixture reaches 305°F, turn off the heat and stir in the butter chunks. Gradually stir in the hot cream; it will bubble up and steam dramatically, so be careful. Turn the burner back on and adjust it so that the mixture boils energetically but not violently. Stir until any thickened syrup at the bottom of the pan is dissolved and the mixture is smooth. Continue to cook, stirring occasionally, to about 245°F. (Kat sez: resist the urge to turn up the heat if the temperature gets "stuck." It took at least 20 minutes for mine to get from 235°F to 245°F, but be patient. You'll get there) Then cook, stirring constantly, to 260°F for soft, chewy caramels or 265°F for firmer chewy caramels.

3. Remove the pan from the heat and stir in the vanilla extract, if using it. Pour the caramel into the lined pan. Let set for 4 to 5 hours, or overnight until firm.

4. Lift the pan liner from the pan and invert the sheet of caramel onto a sheet of parchment paper. Peel off the liner. Cut the caramels with an oiled knife. Wrap each caramel individually in wax paper or cellophane.(Kat sez: in my experience, caramels wrapped in wax paper stay soft longer than those wrapped in cellophane.)

Saturday, November 29, 2008

November Daring Bakers' Challenge: Caramel Cake!


Holy cats. This month's Daring Bakers' Challenge certainly lived up to the "challenge" part of its moniker. But no complaints out of me; that's why I signed up for this group in the first place.

So, on with it: November's challenge brings us Shuna Fish Lydon's Caramel Cake with Caramelized Butter Frosting, as well as an optional non-baked treat, Golden Vanilla Bean Caramels from Alice Medrich's Pure Dessert (more on that tomorrow). Both were bold choices, and I thank hosts Dolores, Alex, and Jenny for introducing me to not one, but TWO recipes that I would probably never have had the stones to try otherwise.

The making of this cake played out much like a pivotal scene in one of my favorite movies, "An Officer and a Gentleman," where Lou Gossett Jr's tough-as-nails Sergeant Foley pushes Richard Gere's Zack Mayo to his emotional breaking point. In my version, the role of Mayo is played by yours truly, and the role of Sgt. Foley is played by caramel syrup.


"Why don't you just give up, Kat?"


"Because I got nowhere else to go!" [sobs]

No, really - I had a five pound bag of granulated sugar and a raging head cold. What else was I going to do with myself on a rainy Saturday afternoon? Like Zack "Mayonnaise" Mayo, I pushed through the obstacle and tried again, this time with much improved results. Moving on.

With the caramel syrup out of the way, the rest of the cake came together relatively easily. I didn't have the recommended round 9-inch pan, so I poured the batter into a square 9-inch pan and hoped for the best. It came out of the oven looking lovely and golden, but it hadn't risen as much as I'd hoped, and when I turned it out onto a platter it looked a little...inadequate. Like, this cake was never going to be a commissioned officer, if you know what I'm saying, and I think you do. To give it a little more dignity, I cut it in half and made a 9 by 4.5 inch layer cake. Then I fought back my tears and saluted it.

A little whiskey and cake never hurt anyone

A final word of warning: this cake is S to the W to the E-E-T, SWEET, so (and I don't say this often) I recommend serving very modest slices for maximum impact. They'll go back for seconds, I promise.

Caramel lifts us up where we belooo-oo-ooong...


Caramel Cake with Caramelized Butter Frosting

- All recipes courtesy of Shuna Fish Lydon -
  • 10 tablespoons unsalted butter at room temperature
  • 1 1/4 cups granulated sugar
  • 1/2 teaspoon kosher salt
  • 1/3 cup Caramel Syrup (see recipe below)
  • 2 each eggs, at room temperature
  • Splash vanilla extract
  • 2 cups all-purpose flour
  • 1/2 teaspoon baking powder
  • 1 cup milk, at room temperature
1. Preheat oven to 350F.

2. Butter one tall (2 – 2.5 inch deep) 9-inch cake pan.

3. In the bowl of a stand mixer fitted with a paddle attachment, cream butter until smooth. Add sugar and salt and cream until light and fluffy. (Kat sez: I don't have a stand mixer, so I used my hand mixer on low/medium low)

4. Slowly pour room temperature caramel syrup into bowl. Scrape down bowl and increase speed. Add eggs/vanilla extract a little at a time, mixing well after each addition. Scrape down bowl again, beat mixture until light and uniform.

5. Sift flour and baking powder.

6. Turn mixer to lowest speed, and add one third of the dry ingredients. When incorporated, add half of the milk, a little at a time. Add another third of the dry ingredients, then the other half of the milk and finish with the dry ingredients. {This is called the dry, wet, dry, wet, dry method in cake making. It is often employed when there is a high proportion of liquid in the batter.}

7. Take off mixer and by hand, use a spatula to do a few last folds, making sure batter is uniform. Turn batter into prepared cake pan.

8. Place cake pan on cookie sheet or 1/2 sheet pan. Set first timer for 30 minutes, rotate pan and set timer for another 15-20 minutes. Your own oven will set the pace. Bake until sides pull away from the pan and skewer inserted in middle comes out clean. Cool cake completely before icing it.

Cake will keep for three days outside of the refrigerator.

Caramel Syrup

  • 2 cups sugar
  • 1/2 cup water
  • 1 cup water (for "stopping" the caramelization process)
1. In a small stainless steel saucepan, with tall sides, mix water and sugar until mixture feels like wet sand. Brush down any stray sugar crystals with wet pastry brush. Turn on heat to highest flame. Cook until smoking slightly: dark amber. (Kat sez: for me, once the syrup started smoking it was already too late. the second time I attempted this, I took it off the heat at medium amber.)

2. When color is achieved, very carefully pour in one cup of water. Caramel will jump and sputter about! It is very dangerous, so have long sleeves on and be prepared to step back.

3. Whisk over medium heat until it has reduced slightly and feels sticky between two fingers. (Obviously wait for it to cool on a spoon before touching it.)

Note: For safety reasons, have ready a bowl of ice water to plunge your hands into if any caramel should land on your skin.

Caramelized Butter Frosting

  • 12 tablespoons unsalted butter
  • 1 pound confectioner’s sugar, sifted
  • 4-6 tablespoons heavy cream
  • 2 teaspoons vanilla extract
  • 2-4 tablespoons caramel syrup
  • Kosher or sea salt to taste
1. Cook butter until brown. Pour through a fine meshed sieve into a heatproof bowl, set aside to cool.

2. Pour cooled brown butter into mixer bowl.

3. In a stand mixer fitted with a paddle or whisk attachment, add confectioner's sugar a little at a time. When mixture looks too chunky to take any more, add a bit of cream and or caramel syrup. Repeat until mixture looks smooth and all confectioner's sugar has been incorporated. Add salt to taste.

Note: Caramelized butter frosting will keep in fridge for up to a month. To smooth out from cold, microwave a bit, then mix with paddle attachment until smooth and light.

Tuesday, November 25, 2008

Happy Thanksgiving!

Copyright Time Inc, from the LIFE magazine photo archives on Google

I'm heading off to the mighty Midwest in a few short hours, but I just wanted to wish everyone a very happy Thanksgiving. Even if you're not American and/or observing the day, I hope you can at least enjoy this photo of a woman wearing a wedding dress made from turkey feathers holding a turkey carcass.

As a gift of thanks to our hosts (my parents), we're toting some sour cherries on the plane for Nick Malgieri's Once-A-Year Cherry Pie, which we like to enjoy all year long by hording summer cherries in our freezer.

Expect posts on pies, wholesome, middle-American fun and the next Daring Bakers' Challenge to come over the next several days.

Saturday, November 22, 2008

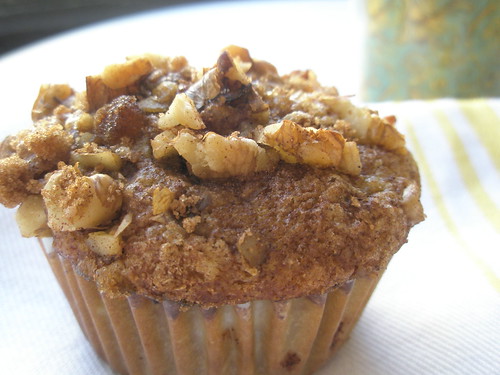
Apple Muffins


The muffin of my eye

I promised you a recipe, and I shall deliver. Never doubt me, kittens.

I stumbled across this one when I was living beyond my means in a studio that was ramshackle in every way but happened to have a decently-sized kitchen. I cut the cable to save money, but the Time Warner tech took pity on me and left me with two channels: the Food Network and Spike. One morning I watched Ellie Krieger make these muffins, and a couple hours and a few episodes of "Man Versus Beast" later, the apple-cinnamon smell was wafting through my overpriced shoebox.

The recipe makes a dozen, but I like to freeze them and sling 'em in the toaster oven on chilly mornings.


Apple Muffins

- Adapted from Ellie Krieger's recipe on FoodNetwork.com-

Make a dozen muffins
  • 3/4 cup plus 2 tablespoons packed brown sugar
  • 1/4 cup chopped walnuts
  • 1/2 teaspoon ground cinnamon
  • 1 cup all-purpose flour
  • 1 cup whole-wheat pastry flour
  • 1 teaspoon baking soda
  • 1/2 teaspoon salt
  • 1/4 cup canola oil
  • 2 large eggs
  • 1 cup natural applesauce
  • 1 teaspoon vanilla extract
  • 3/4 cup lowfat buttermilk
  • 1 Golden Delicious apple, peeled, cored and cut into 1/4-inch pieces

1. Preheat oven to 400 degrees F. Lightly grease a muffin pan or fill with liners.

2. In a small bowl, mix together 2 tablespoons of the brown sugar, the walnuts and cinnamon.

3. In a medium bowl, whisk together the all-purpose and whole-wheat flour, baking soda and salt.

4. In a large bowl, whisk the remaining 3/4 cup sugar and oil until combined. Add the eggs, 1 at a time, whisking well after each addition. Whisk in the applesauce and vanilla.

5. Whisk in the flour mixture in 2 batches, alternating with the buttermilk. Whisk just until combined. Gently stir in the apple chunks.

6. Pour the batter into the prepared muffin pan and sprinkle with the walnut mixture. Tap the pan on the counter a few times to remove any air bubbles. Bake for 20 minutes or until a wooden pick inserted in center of 1 of the muffins comes out clean.

7. Let cool on a wire rack for 15 minutes. Run a knife around the muffins to loosen them and unmold. Cool completely on the rack.

Friday, November 21, 2008

Woe is the Sick Baker


A few weeks ago I complained that the mild weather was foiling my favorite autumn pastime of making and consuming warm, comforting baked goods. Well, I finally got my wish. It's just a few degrees above freezing now, but am I buzzing around the kitchen in a cloud of flour? No. I am lying on the couch mainlining tea and Emergen-C while watching "Jon and Kate Plus 8." Because I have a miserable cold, and multiple birth programing is the only thing that gets me through, apparently.

On Monday I stayed home from work, so after thirteen or so hours of sleep I summoned the energy for a batch of Kinda Healthy-ish Snacking Cookies, but after a week of inertia I'm jonesing for another challenge. So take heart, my Baking Kittens! I'll be slinging a spatula again in the very near future.

Big, buttery hugs,
Kat

Tuesday, November 11, 2008

The Donut Hole


The Donut Hole, originally uploaded by GarySe7en.

At least it's not glazed.

Thursday, November 06, 2008

Yes We Cake!

From Smohundro's Flickr Photostream

I meant to say this yesterday, but I think I was still in shock: November 4th, 2008 at around 11pm EST will go down as one of the coolest/proudest/most patriotic moments of my entire life. I didn't think that my friend Jessie's chili could be improved upon, but washed down with the sweet taste of victory after eight years of bitterness and disgust? Yes, yes it can.

UPDATE: There is an entire Yes We Cake website full of President Cake-Elects! And it's run by Melissa of Cake Hero! Melissa made a Morrissey cake for our friend Tony's birthday a few months back, and it was amazing, although I didn't know whether I should eat the cake or throw it on my mom's carpet and write tear-stained poems in my room. But anyway, thanks for the tip, Nina and Dan!


Wednesday, November 05, 2008

Bare Necessities (Plus)


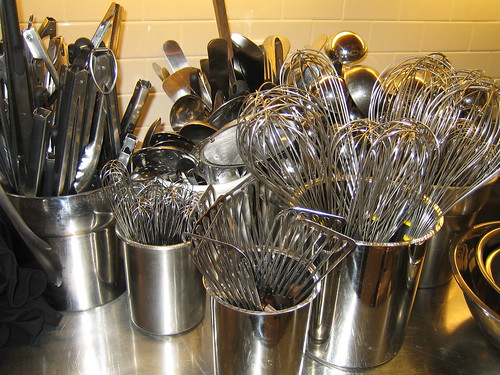
Does Anyone Have a Whisk?, originally uploaded by pattie74_99.

As I've mentioned before, the Dude and I are getting married this summer, which I've heard from other home cooks is the greatest thing that could ever happen to your kitchen. That got me thinking: when friends and family start asking what we'd like as gifts (even though they know perfectly well that the only thing I've ever wanted was a pony, *gah*), what should I say? We're pretty set on the basics - measuring spoons, mixing bowls, spatulas - but what slightly esoteric tool or piece of equipment can you not live without? Lemme know in comments pls thx.